1. A diagram is a map of relationships
A good human anatomy diagram does more than identify a collection of body parts. It shows where structures lie, how they connect, and which relationships matter when examining a patient, explaining a procedure, or interpreting a report. For medical students, practice assistants, hospital staff, physicians, and eldercare teams, this visual language creates a shared foundation for precise communication.
Anatomy concerns structure; physiology concerns function. Gross anatomy examines structures visible without magnification, while microscopic anatomy includes histology, the study of tissues, and cytology, the study of cells. A regional diagram examines neighboring structures in one area; a systemic diagram follows a functional network across the body. Each approach answers a different question. [1]
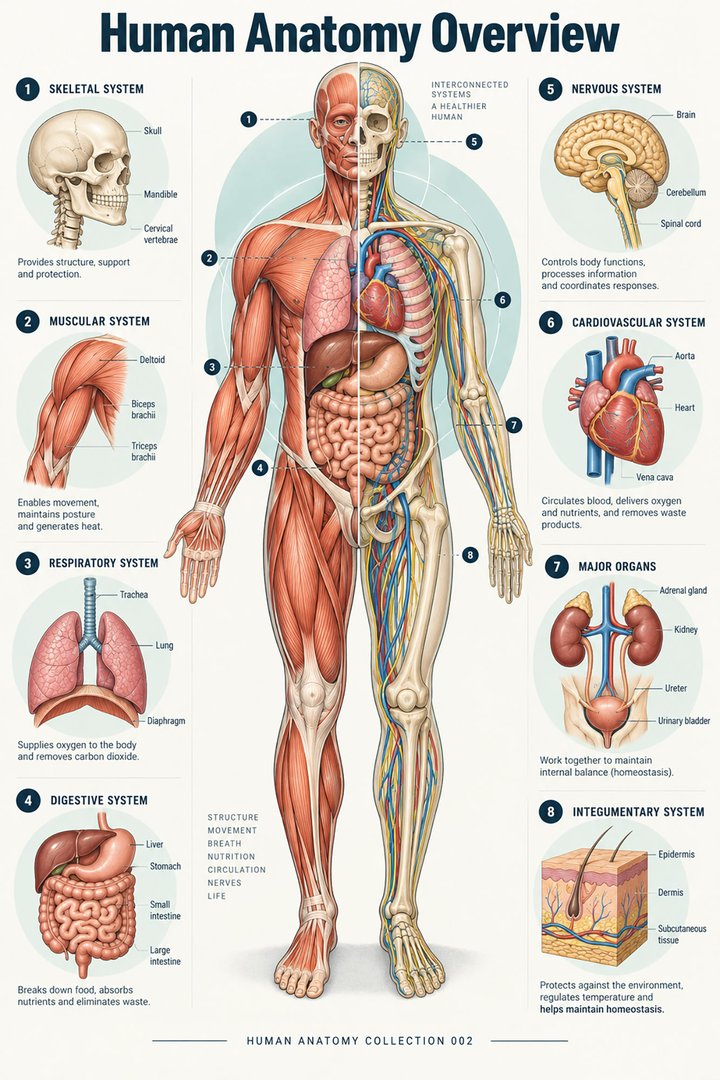
Consider a shoulder illustration. A skeletal view may help you identify a landmark, a muscular view may clarify movement, and a regional view may reveal nearby nerves and vessels. Before memorizing labels, ask what the image is designed to teach. A diagram made for public education may deliberately omit details required for an anatomy examination or specialist discussion.
2. Establish orientation before reading labels
The standard anatomical position is upright, facing forward, with palms directed anteriorly. Right and left refer to the person being depicted. In an anterior view, the patient's right therefore appears on the viewer's left. Directional terms continue to refer to this reference position even when a patient is lying down. [2]
| Term | Meaning | Example relationship |
|---|---|---|
| Anterior / posterior | Front / back | The sternum is anterior to the heart. |
| Superior / inferior | Above / below | The thorax is superior to the pelvis. |
| Medial / lateral | Toward / away from the midline | The nose is medial to the eyes. |
| Proximal / distal | Nearer / farther from a limb's attachment | The elbow is proximal to the wrist. |
| Superficial / deep | Nearer / farther from the surface | Skin is superficial to skeletal muscle. |
Supine means lying face upward; prone means lying face downward. Record these positions separately from the anatomical location. A lesion does not change from posterior to anterior when a patient turns over. [17]
A useful reading habit is to say the viewpoint aloud: “anterior view, patient's right on my left.” Then identify one unmistakable landmark before interpreting less familiar labels. This small pause helps when alternating between a textbook, a patient-facing body chart, and a clinical image.
3. Understand the three principal anatomical planes
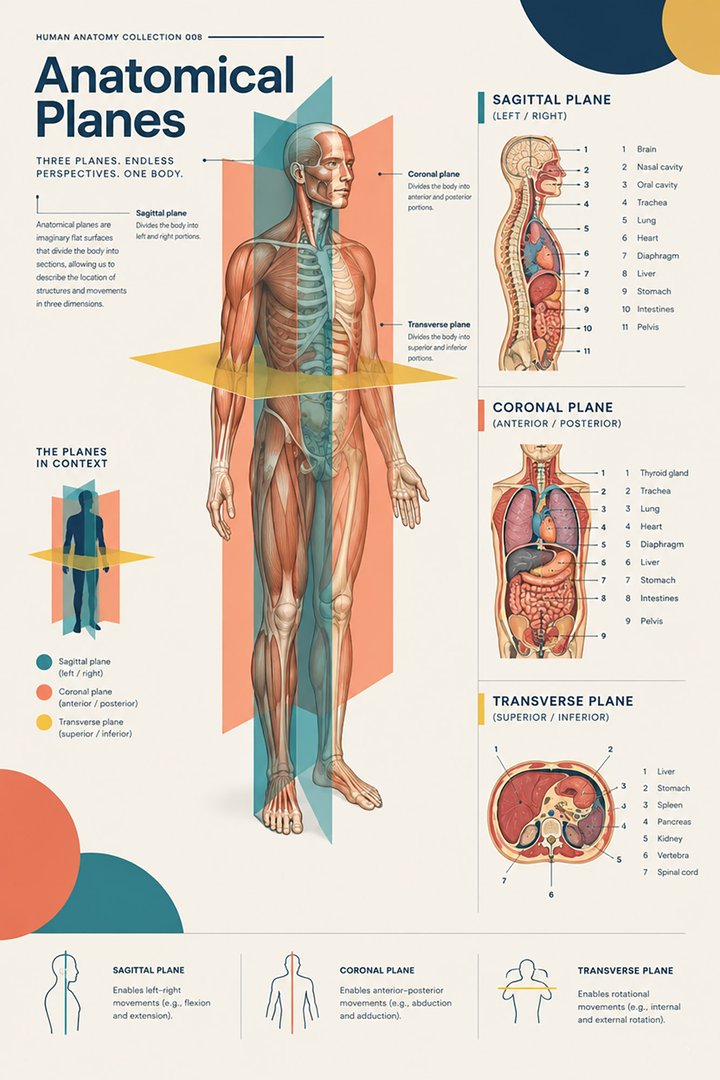
A sagittal plane divides right from left; a midsagittal plane passes through the midline. A coronal, or frontal, plane divides anterior from posterior. A transverse, or axial, plane divides superior from inferior. An oblique section runs at an angle to these principal planes. [2]
A cut surface and a projection image are different kinds of information. A section presents structures intersected by a plane; a projection can superimpose structures along the path of the beam. This distinction explains why a bone may overlap another bone on a radiograph while separate cross-sectional slices show their individual positions. [11]
When studying a scan beside an atlas illustration, match the plane first. Also check the displayed orientation markers rather than assuming that every image follows the same screen convention. Mentally move through adjacent slices: an organ can appear, enlarge, change shape, and disappear as the section level changes. One isolated slice rarely conveys the full three-dimensional relationship.
4. Latin names make anatomical language portable
International anatomical terminology uses standardized Latin terms with equivalent names in other languages. The second edition of Terminologia Anatomica was published in 2019 and adopted by the IFAA in 2020. Latin labels are particularly useful when comparing atlases, teaching materials, and multilingual teams. They are a naming system, not a substitute for describing the actual finding. [3]
| English | Latin designation | Reading cue |
|---|---|---|
| Heart | Cor | Central cardiovascular organ |
| Brain | Encephalon | Entire brain; cerebrum is a subdivision |
| Spinal cord | Medulla spinalis | Neural tissue within the vertebral canal |
| Lung | Pulmo | Plural: pulmones |
| Liver | Hepar | A Latin anatomical term with Greek roots |
| Kidney | Ren | Plural: renes |
| Stomach | Gaster | Also encountered as ventriculus |
| Urinary bladder | Vesica urinaria | Distinguish from the gallbladder |
| Thigh bone | Femur | Bone, rather than the entire thigh region |
| Heel bone | Calcaneus | A useful foot landmark |
Do not assume that every medical word is Latin: many terms have Greek origins or combine roots from different languages. Pair a name with a location and a relationship. “Ren: posterior abdominal organ” is more memorable than an isolated translation. For formal assessments, check which preferred term and synonym your institution uses.
5. Read compartments and organ placement together
The cranial cavity contains the brain, and the vertebral canal contains the spinal cord. The thoracic cavity lies above the diaphragm; the abdominopelvic cavity lies below it. These compartments help explain how protective structures organize the body rather than leaving organs as an unordered collection. [15]
The heart occupies the mediastinum between the lungs, with its apex generally directed leftward. It is therefore misleading to picture the whole heart as sitting exclusively in the left side of the chest. [6] The kidneys are retroperitoneal: they lie behind the parietal peritoneum on the posterior abdominal wall, and the right kidney is usually slightly lower than the left. A front-facing organ poster cannot show all of this depth. [9]
For learning, place a transparent mental layer over the diagram: surface landmarks first, cavities second, organs third. If a poster removes the ribs or abdominal wall, recognize that it is exposing relationships that are normally hidden. A cutaway represents a teaching choice, not an opening that exists in the intact body.
6. Follow pathways instead of isolated organs
Introductory teaching commonly groups the body into eleven organ systems: integumentary, skeletal, muscular, nervous, endocrine, cardiovascular, lymphatic, respiratory, digestive, urinary, and reproductive. These categories are useful, but their boundaries overlap. The pancreas, for example, contributes to both digestion and endocrine regulation. A comprehensive diagram should make these connections understandable rather than imply that every organ has only one job. [4]
In the cardiovascular system, trace venous return to the right atrium, then the right ventricle and pulmonary arteries. After exchange in the lungs, pulmonary veins return blood to the left atrium; the left ventricle ejects it into the aorta. Arteries carry blood away from the heart and veins return it. Oxygen content is a separate property: pulmonary arteries carry relatively oxygen-poor blood, while pulmonary veins carry oxygen-rich blood. [6]
For digestive diagrams, distinguish the route food takes from the organs that provide secretions. Mechanical processing, chemical digestion, propulsion, absorption, and elimination are linked activities. A liver or pancreas drawn beside the intestine is not another chamber through which the swallowed food normally passes. [16]
For nervous system diagrams, first distinguish the central nervous system—the brain and spinal cord—from peripheral connections. Then ask whether the figure is showing an external surface, an internal section, or a functional pathway. A colored cortical region should not be read as an isolated switch: anatomical organization and interconnected processing must be considered together. [8]
7. Anatomy in numbers: useful statistics with context
The conventional adult skeleton contains 206 bones: 80 axial and 126 appendicular. Those groups represent approximately 38.8% and 61.2% of the conventional total, respectively, calculated here from the textbook counts. They are proportions of a classification, not survey estimates of a population. The total is a teaching reference rather than a guarantee for every individual. [5]
The right lung normally has three lobes, while the left has two. This asymmetry is an excellent reminder that a bilaterally organized body is not internally identical on both sides. Lobes are separated by fissures; smaller bronchopulmonary segments are a different level of organization. [7]
At the microscopic level, the four major tissue categories are epithelial, connective, muscle, and nervous tissue. An organ combines multiple tissue types. A schematic that gives an organ one uniform color has simplified a complex internal structure. [10]
A frequently cited 2009 study reported a mean of 86.1 ± 8.1 billion neurons in sampled adult male brains. This is a research estimate, not a count applicable to every person. A later analysis highlights substantial uncertainty in available estimates. The useful lesson for diagram readers is that the visible outline of an organ reveals little about its cellular complexity. [12] [13]
8. Compare clean illustrations with real visual evidence
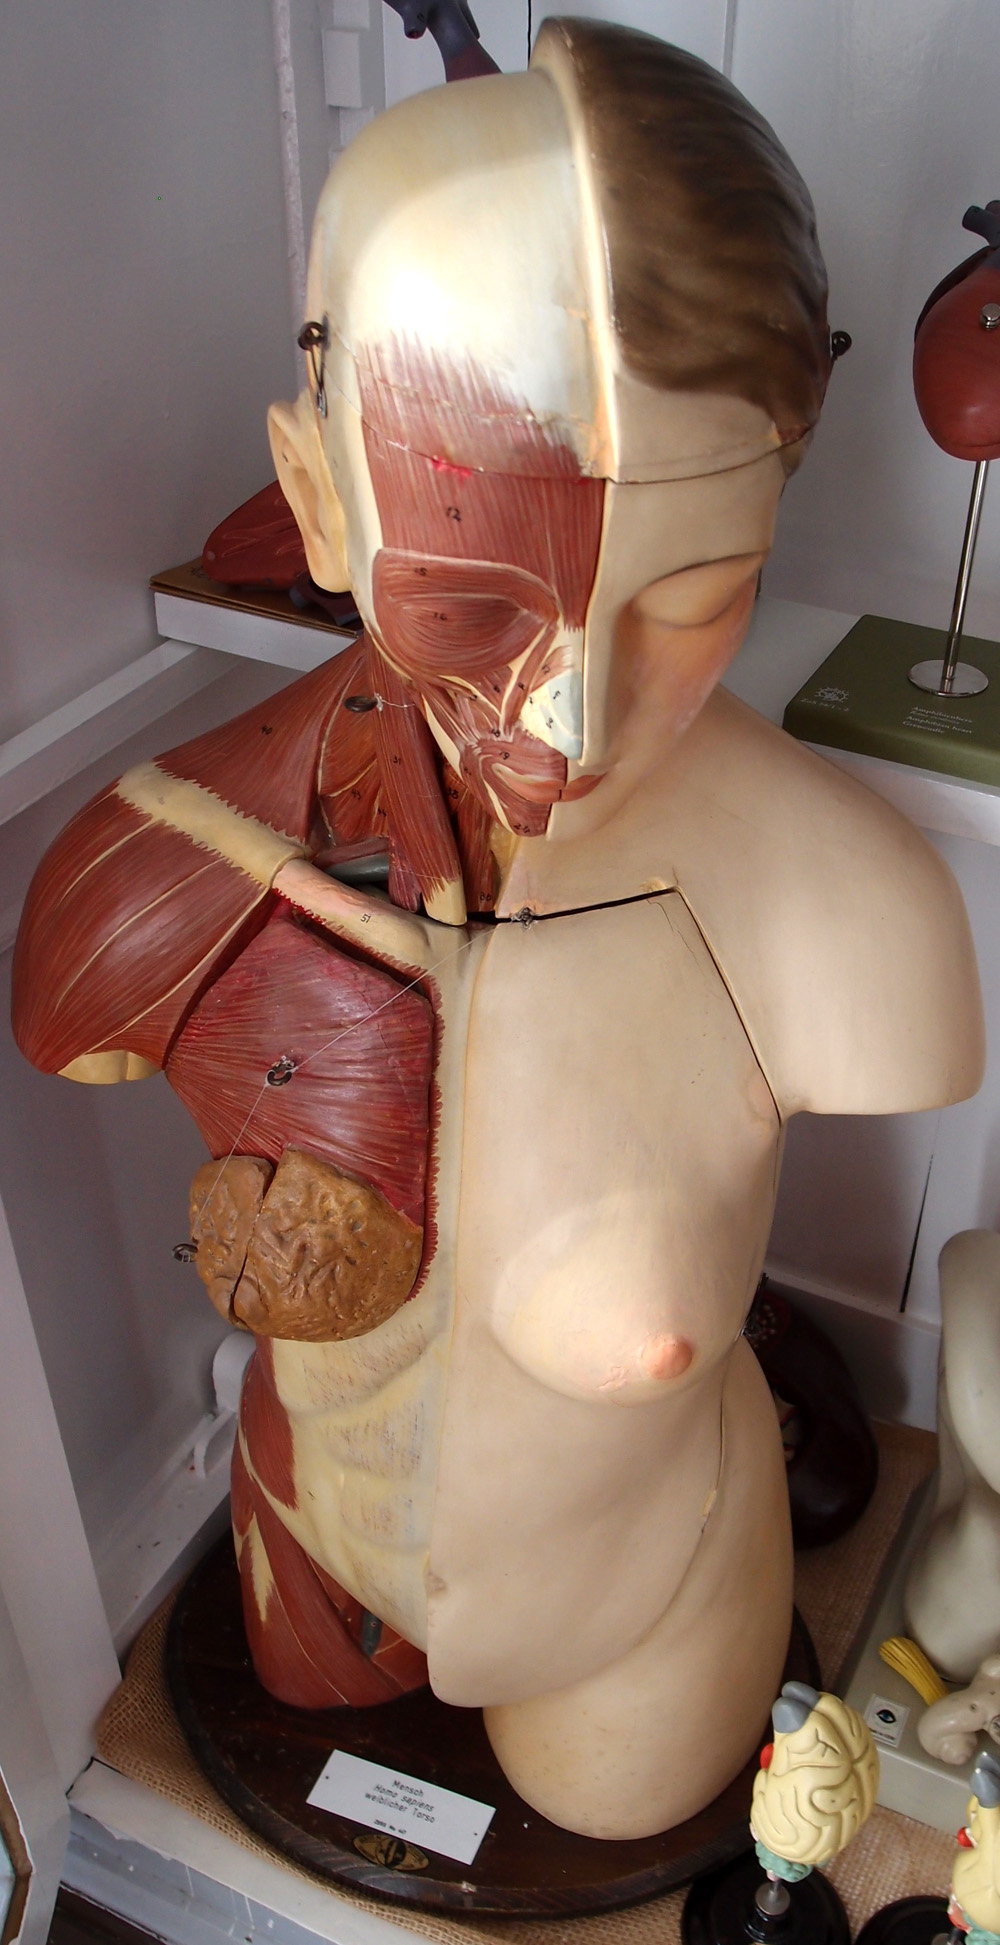
Diagrams intentionally remove clutter. Real photographs, physical models, and clinical scans restore some of the complexity, but each has its own limitations. The photograph below shows a historical teaching model with removable parts and exposed muscular layers. It is a real photograph of a model, not a photograph of a patient's internal organs.
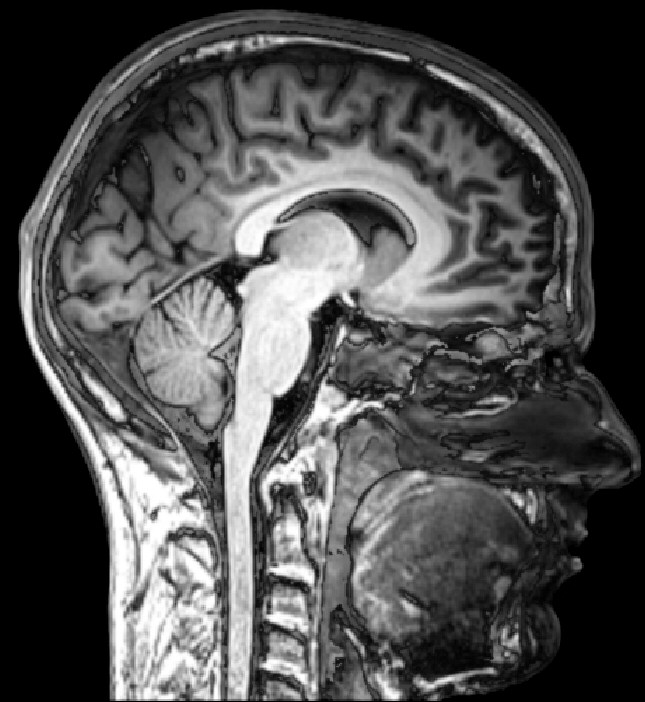
In the MRI, the face points toward the image's right. This is a lateral orientation of a sagittal section, not an anterior body view. Look for broad relationships among the cerebrum, cerebellum, brainstem, and upper cervical region. The image is included to teach orientation, without making a statement about the patient's health. [8]
CT uses X-rays to generate sectional data. MRI uses magnetic fields and radiofrequency signals; ultrasound uses sound waves. Their appearance depends on the acquisition method and settings. Brightness should never be interpreted using a universal “white equals bone” rule across all modalities. [11]
When comparing the model and scan, describe what each actually reveals. The model exposes a surface layer that has been artistically separated; the scan samples internal relationships within a section. Neither should be treated as a complete, interchangeable representation of the living body.
9. Make diagram reading useful in clinical work
For medical students: choose one region and move through three representations: a labeled illustration, an unlabeled version, and a section or specimen image. Identify the same landmark in each. Then explain its relationship to two neighboring structures. This exercise turns visual recognition into a spatial explanation rather than a list of memorized words.
For practice assistants and hospital staff: use a body chart to clarify the side and site described by the patient. Document observations with an agreed anatomical term and a clear laterality statement. An illustrative example might be “patient reports discomfort over the left lateral ankle,” rather than “pain here.” The chart supports communication; it does not establish the cause of the symptom.
For physicians: diagrams can help explain an investigation or procedure in accessible language. Ask the patient to point to the area and restate the explanation in their own words. A shared picture is particularly valuable when a term such as “behind,” “below,” or “inside” might otherwise be understood differently.
For eldercare teams: connect surface landmarks to underlying support structures. Pressure injuries commonly arise over bony prominences or in relation to medical devices, and can involve deeper soft tissue as well as skin. Anatomy helps explain why a surface observation should be considered alongside the person's position, mobility, and care plan. [14]
Across these settings, separate a location from an interpretation. “Posterior right heel” specifies a site. A diagnosis requires additional assessment. Use approved local documentation tools and clinical protocols for patient care; the educational schemes here provide orientation and vocabulary.
10. A repeatable method for studying any anatomy diagram
- Read the purpose and caption. Decide whether you are looking at surface anatomy, an exposed layer, a section, or a pathway. Note omitted structures.
- Confirm orientation. Identify the viewpoint, patient's side, plane, and section level before naming smaller features.
- Find three anchors. Pick a large landmark, a neighboring structure, and a connecting pathway. Use these to organize the remaining labels.
- Follow a relationship. Trace a vessel, duct, nerve, or attachment. Explain where it begins, where it goes, and what it passes beside.
- Retrieve without labels. Cover the names and describe the image in complete sentences. Check uncertain terms against a reliable atlas.
- Change the representation. Compare an alternate view or a real image. Ask what remains recognizable and what the first diagram concealed.
Keep a short error log. If you confuse medial with proximal, write the two definitions beside a specific limb example. If you reverse the patient's side, sketch a front-facing figure and mark its right hand. Correct the reasoning that produced the error, rather than simply repeating the answer.
During team teaching, have one colleague describe a structure without naming it and another point to it on the diagram. Discuss any disagreement about view, depth, or terminology. This makes ambiguities visible before the same words are used in a handover or record.
11. Check your understanding
Use these short questions after reading, then open each answer to compare your reasoning. They test orientation and interpretation rather than a long list of labels.
In an anterior body diagram, which side of the picture shows the patient's right?
The viewer's left. Laterality belongs to the person depicted, not to the observer. Confirm labels whenever an image has been rotated or mirrored.
Which plane divides the body into superior and inferior portions?
The transverse, or axial, plane. Sagittal divides right and left; coronal divides anterior and posterior.
Why can a blue vessel in a teaching diagram still be an artery?
Color may encode oxygenation. Vessel classification depends on the direction of flow relative to the heart. Pulmonary arteries carry blood away from the heart toward the lungs.
Does a photograph of a torso model show natural tissue colors?
No. It records the real appearance of the model, whose colors and exposed layers were chosen for teaching. Always distinguish the subject photographed from the anatomical reality it represents.
The strongest understanding emerges when you can translate between a name, a location, an image, and a useful explanation. Start with orientation, learn relationships, and let the labels support a three-dimensional mental picture of the human body.
Sources and image credits
Sources checked on 8 October 2026. Numbered links beside the relevant claims open the supporting source. Statistical values are distinguished from conventional teaching counts and calculations.
- Overview of anatomy and physiology — OpenStax, Anatomy and Physiology 2e (2022).
- Anatomical terminology — OpenStax, Anatomy and Physiology 2e (2022).
- FIPAT: Terminologia Anatomica, second edition.
- Structural organization of the human body — OpenStax, Anatomy and Physiology 2e (2022).
- Divisions of the skeletal system — OpenStax, Anatomy and Physiology 2e (2022).
- Heart anatomy — OpenStax, Anatomy and Physiology 2e (2022).
- The lungs — OpenStax, Anatomy and Physiology 2e (2022).
- The central nervous system — OpenStax, Anatomy and Physiology 2e (2022).
- Gross anatomy of the kidney — OpenStax, Anatomy and Physiology 2e (2022).
- Types of tissues — OpenStax, Anatomy and Physiology 2e (2022).
- Medical imaging — OpenStax, Anatomy and Physiology 2e (2022).
- Azevedo et al. (2009): neuronal and nonneuronal cell counts.
- Goriely (2025): uncertainty in human neuron estimates.
- Edsberg et al. (2016): revised pressure injury staging system.
- Animal body planes and cavities.
- Digestive system processes and regulation — OpenStax, Anatomy and Physiology 2e (2022).
- Anatomy and Physiology: key terms.
Visual provenance
Figures 1–3 and the bone-count bar are original simplified educational graphics. The cover graphic is decorative. Figures 4–5 are externally sourced real visual material with creator, source, license, and modification information in their captions. Photographs remain under their respective Creative Commons licenses.
This article uses independently written explanatory prose and cites published anatomical facts; it does not reproduce OpenStax illustrations or textbook passages. No clinical author or peer-review credential is claimed.